Showing posts with label homemaking. Show all posts

Tuesday, January 9, 2018

John the Woodman and the Vanilla Bean

Every winter for twelve years, John the Woodman regularly bought me generous loads of pre split firewood which he stacked neatly. Into his eighties, wearing tiny shorts in all weathers, he continued to arrive in his battered old ute full of seasoned 'ping ping' jarrah. Kind and considerate, always polite, funny and self deprecating, his determination to never to slow down was admirable.

 Always up for a chat, he was especially curious to hear of our holidays in Indonesia, having lived there as a child.  We encouraged him to revisit but he always said that he didn't want to see it changed, that he wanted to remember it as it was. John had fond memories of Indonesian food and one night we invited him to share an Indonesian feast starring  kangaroo rendang with us, thinking the meeting of two cultures would amuse him.

I had been lucky enough to be given a kilo of vanilla pods and after the meal had been savoured and a doggy bag packed for John to take home, I bought them to the table for John to see. It had an impact I could never have imagined. As a child in Java, John had played in the vanilla plantations. I am not sure if his parents owned them but he certainly knew a lot about them. It was a profitable business to be involved in and much favoured by the Dutch.

Vanilla planifolia originated in South America and was 'discovered', along with its culinary partner, cacao and was taken to Europe, where it failed to thrive. The only known pollinator, a melipone bee, did not exist outside of Mexico and the orchids refused to set pods for the next 300 years until Charles Morren, a Belgian botanist, developed a method of hand pollination. Each flower, open for only a few hours for one day must be opened and hand pollinated to produce one pod, each taking about two months to develop.

The process of curing the bland green pods to the fragrant sticky brown ones  involves sweating the pods at temperatures up to 65 centigrade with high humidity, wrapping and storing and repeating each day. The process may be started by immersing in boiling water or by being laid out in the sun for a few hours in the morning before being rolled up in blankets and stored before repeating until the pods are brown and fragrant. This can take up to 14 months.They are then laid out to dry. Add to the time involved the fact that crops are often decimated by cyclones and tropical storms and do not begin to flower until they are 3-5 years old we can appreciate why the world's favourite flavouring so expensive to buy.

Johns eyes filled with tears as he inhaled the sweet fragrance. John was a young boy when the Japanese invaded Java and with other Dutch families were herded into detention camps, the men to prison camps. We heard many stories that night of life in the camp, the hardships and lack of anything for the children to do. John was a lucky one. The Japanese were aware that for the vanilla crops to continue, the groves would need to be worked. Being young and agile, John was released early each morning to walk the many miles to the vanilla groves.Using a sharpened stick, he gently eased the pollen  out to press behind the stamen. Over and over, up and down ladders, on his own until it was time to head back. He was proud of his work, the freedom it gave him and the extra food he was sometimes able to find. Three years later, the Japanese were defeated and the Dutch East Indies became Indonesia. John and his family went to live Holland  from where he immigrated to Australia.

In 2016, John seemed to be slowing - a couple of accidents in the bush while working alone didn't stop him and his sons gave him a mobile phone. The death of his favourite dog impacted on him and his ute often refused to cooperate. We wondered if it would be better to stop ordering firewood as no matter what, he would deliver, though one of his sons was often with him now. Last year he seemed to vanish from sight, the phone went unanswered and was eventually disconnected and I stopped bumping into him in town. No one seemed to know where he was.

Just before Christmas I decided to use some of the vanilla and started some vanilla essence, extract and sugar. I gave all my friends a bunch of pods for Christmas. A call one evening in early January told me John had died. It was especially poignant that I had been surrounded by the fragrance of vanilla for the last few weeks. I would have loved to have bought you some John but ever the gentleman, you didn't want a fuss and left quietly.

This little part of the richness of your life that you shared with us I cherish. Your memory will live on for me in your story, in the warm fragrance of vanilla and as I use the sturdy chopping block you cut for me.

Go well my friend x Nirala


Tuesday, September 14, 2010

Baking, babies and boob jobs

I am a sucker for kitchen gadgets. I have a kitchen full of them. Amita came home with a ‘garlic roller’ from town. It is a little tube of silicone, open at each end, that you pop garlic cloves into, roll them around and then hey presto! Peeled garlic, not squashed and no waste. Brilliant!
But here we are again, back to the silicone debate.
There is no doubt that silicone is a marvellous substance. In its various forms we can: glue the aquarium, clothe our mobile phones with it, bake in it and enhance our breasts with it if we are so inclined. Teats for babies bottles  and toys are now being made from it too. It has uses in medicine, electronics and engineering, and it is long lasting and odour and stain repellent (there is some debate about both these issues though.) Its flexibility worries me – surely it needs to stand on a normal metal tray to get safely in and out of the oven?


It does come in many pretty colours (are these food safe too?) and there is no doubt that it is light, durable and long lasting and makes the best juggling balls. Does that make you want to bake with it?
It is claimed too that although it is not biodegradable, it is recyclable after a long life of use, though not in Australia.
One safety issue regarding silicone cookware is that the cheaper items may contain fillers. This will not appear on the label and could be any type of plastic. One hint I have read is that if you twist the item and white shows up in the bend, the item could contain filler.
On the net, most of the research parrots a report published in May this year from the FDA (US) in Scientific  American. The pros are outlined but basically, any good research on the down side is yet to be published even though the product has been around since 1979. I was concerned to see that the recommended maximum temperatures for use varied from 300 to 482 degrees Centigrade! Apparently this varies with each manufacturer and is marked on the packaging. But who keeps the paper wrappers for every item in their kitchen?
I think we all need to choose for ourselves. My spatulas show no signs of wear although I use them regularly on my Thermomix, where they outperform the original scraper which is now pitted and worn from its contact with the blades. They are not stained after a year of intense use including curry making and have no melted parts although I have snapped the plastic handle of one of them mixing a heavy loaf. The brush is a nuisance, I will return to natural bristles which work well and are about the same to keep clean. The brush has also become stained with use so I suspect it is of the 'cheap and nasty' variety. 

I boughta silicone baking sheet today but it won’t be going in the oven. I am going to try and de-hull roasted nuts and cooked broad beans with it.
Check out the links and decide for yourself.

Monday, July 19, 2010

Grandma's undies

My grandparents never owned a washing machine and had probably never imagined a clothes dryer. As a child I remember tea towels and nappies would be boiled (separately) in the copper and my grandfather would do the rest of the weekly wash in the bath tub.
We lived in a very damp part of the Home Counties. In summer the washing was hung on ropes with hand carved wooden pegs we bought from the gypsies who visited each year and propped with long  forked sticks. In the winter, the washing was hung on a clothes pulley above the kitchen which boasted an electric oven and an open fireplace and was the warmest room in the house. The pulley loaded with wet washing was hauled up into the air, resting near the ceiling where it dried in record time.
When I first moved here, I was delighted with the fact that my Raeburn wood stove in the kitchen and high ceilings meant I could have a pulley of my own. It was cheaply constructed from timber off cuts of 630cm of 40mm x 20mm timber salvaged from old garden chairs and 7 x 180mm lengths of 10mm dowel. A chain was attached with screws at each end and used to hang the builders twine that was then threaded through two small pulleys attached to the ceiling. The cord is knotted to prevent it from coming away and is hitched onto a firmly secured hook set into solid timber.
Please take care that the cord and all other cords are kept out of reach of children. I recently found our ancient poodle with it round his neck, walking around in very confused circle. If he had managed to pull the cord off the hook, the weight of the washing would have strangled him. 
I can put a full load from my washing machine up in the rafters in the evening and most of it is totally dry by morning. My visitors, the ones that notice it, are hugely entertained by it but most people don’t notice it. I do try to remove the underwear from it each morning and to not load it up when I am cooking anything with a strong smell. The dogs may love me smelling of lamb roast but it’s not a great perfume for supposedly clean clothes!
This simple solution to clothes drying uses the heat from the stove, which also heats our hot water (and the house) and there is no tripping over clothes horses or rushing in and out as the rain comes and goes. Spread with a towel, it dries my felting. In summer it can dry herbs and chillies in bunches or lay on fly wire. When not full of washing, it airs the bathroom towels. My ten year old grandson insists he’d like to sleep on it!
Can your clothes dryer do all that and not cost you an extra cent on your power bill?


Monday, April 5, 2010

Picking for pectin

The quince outside the kitchen window has the most magical flowers looking like enormous single apple blossoms with a blush of pink and a delicate scent. As it grows in the chicken pen and gets the overflow from their water bowl and the garden sink, it thrives. This year we picked 21 kgs, leaving the highest fruit for the parrots, who adore them too.
Preparing quinces for cooking is a tedious job. You need to rub them under running water to remove their fuzz before peeling and coring. Cutting out the core of a quince is rather like trying to saw your bread board in half with a vegetable knife - hard and woody.
After I had made four and a half kilos of quince paste and a quince crumble, I was well over processing quinces. Fortunately, you can pick quinces green and they will ripen off the tree, so I left the rest for a couple of days while I did some research and scrubbed the sticky goo off the kitchen walls.

My trusty Times Life preserving book mentions that you can make pectin out of quinces, as well as apples and as I use pectin often, I was happy to try.


Pectin
4.5kg quinces or apples
Water to cover

Roughly chop the washed fruit, including the peels, cores and seeds.
Place in a large pot and barely cover with water.
Bring to the boil then reduce heat and simmer till soft.
Drip contents through a jelly bag, at least overnight.
Return to the clean pan and boil until the quantity has reduced by half.

Test for pectin...exciting

You can test how strong the pectin content is by putting a teaspoon of juice into  bowl and mixing in two tablespoons of methylated spirits.
Swirl together.
If the pectin content is low, small separate lumps will form. Juice high in pectin will form one large mass.
Discard the mixture from the bowl...don’t attempt to eat it.
If the set is not strong, continue to reduce the liquid and test again.
Filter through muslin before bottling.

Pour into sterilised bottle and seal or freeze in ice block trays

To use:
Rule of thumb, according to the book, is 150ml of pectin to 1.25 litres of fruit juice for making jelly. It should be enough for 2kg of soft fruit when making jam.

Quince pectin has the lovely red colour of cooked quince and a distinctive flavour. It is particularly good with berries, pears and apples.

Happy preserving

nirala

Tuesday, March 2, 2010

Return of the hubble bubble

You may remember that a while ago I set up a little trial to see if I could brew a natural citrus enzyme cleaner. Its been three months and a couple of days through the hottest summer on record and I reckon if anything is going to be fermented, it would have done so by now. There have been no signs of anything happening in the jar for a while now so I suspect it has gobbled up all its sugar and settled down. Time to open it up... I put it into a muslin lined sieve over a bottle to strain. The lemon chunks turned to lovely slime when I poked them with my finger. After it sat in the sieve for a while, there was almost nothing left except every vinegar fly in town had come to see what was happening! The smell is pleasant, fresh, lemony, slightly alcoholic and slightly drying to your skin. It looked cloudy at first but settled to a lovely clear liquid.


I set off with a little undiluted brew and some paper towel and tested it on glass, enamel, ceramic tiles, plastic, stainless steel and laminate flooring. It was brilliant on the stainless steel stove hood, cutting through the grease and a weeks dust easily and polishing up nicely with a dry piece of towel. Magic on the bathroom mirror too - no smears. Best of all was the dreaded shower screen where with a little extra elbow grease it cut through the build up of soap scum. The tiles and the laminate floor dried nicely, I was afraid that any remaining sugar residue may leave a sticky residue but it didn't.


I imagine that if you dilute the brew with hot water for greasy areas, you wouldn't have to rub quite so hard. For floor surfaces it is would be great used with a microfibre mop. I am going to add 1% of lemon scented gum essential oil to the bottle to add disinfectant and antibacterial propertiesto it and use it as an all purpose cleaner. It is certainly environmentally friendly and cheap and easy to make. I have another brew due next month that I have made with even less expensive white sugar.

You are not going to see before and after photos - I need to mop the other half of the kitchen floor; explain why one light switch is cleaner than the rest; why there is a nice clean circle of glass in the middle of the shower screen; why only the front of the stove and the handle of the refrigerator are clean. Who am I kidding? I'm the only one who will notice and I can ignore it for days if need be. I'm going to put on another brew to use up the last squishy lemons that would otherwise end up in the compost.

May your cleaning be painless,

nirala

Monday, February 22, 2010

Not so scrappy after all


Behind my armchair I have a mountain of bags and boxes that are no longer hidden. They threaten to topple over the back and I fear that this would be the end of my yarn buying for a while. They contain various yarns for projects in progress, leftovers from projects past and for projects not yet imagined. I am a compulsive collector hoarder of craft materials and shiny things.


My daughter recently gave birth to our fourth grandchild. I have always welcomed the new babies with a handmade cot blanket. Never knowing the sex in advance, they have always been patchwork, multicoloured and bright. With a recurring family allergy to wool, they are usually made from cotton and bamboo or ramie blends of yarn. I can’t throw away the smallest pieces, the colours are so lovely, and these balls are a great way to recycle scraps. They are soft to touch and lightweight and they wipe clean with a damp cloth. The youngest children have either a ball or a cot toy made from off cuts and others have gone to jugglers and other peoples cats.


This is what you’ll need:

Newspaper

5 ply wool or knitting cotton scraps

A ball of scrap wool and a bodkin

Method:

1. Scrunch up the newspaper into tight balls. One double spread of The Australian is enough to create a large ball, a quarter of a sheet, the smallest.

2. Take the scrap ball of wool and begin to wind it around the newspaper ball, taking care to keep the ball as round as possible until the newspaper has disappeared under an even layer of wool. Tuck in the end securely. You should now have something that looks like a ball of wool.

3. Using the bodkin and a 5 ply thread, begin to chain stitch around the ball, fixing the stitches into the wool. When you come to the end of a piece of thread, finish it by threading a few running stitches across the winds of wool.

4.If you find that the wool is slipping as you embroider it, you can run some lines of running stitches over them at any time to help keep them in place.

5. Continue to embroider close rows of chain stitch to cover the ball. If you want to hang the finished ball, leave the ends of three rows as loose thread in the same spot and plait them together when the ball is finished. Trim any loose ends.

6. The balls are easily reshaped by rolling in your hand as you are working, so don’t worry too much if they don’t seem completely round.


During the last few difficult weeks, the process of making these little balls, their soothing roundness and the comforting repetition of the simple task of embroidery have allowed me a place of calm, of softness and quiet normalcy. They now fill a bowl on the table, their bright colours a happy focus in a time of sadness.

nirala


Tuesday, November 17, 2009

More Hubble Bubble

A weekend visitor asked if she could take a photo of my window sill. She said that no one else had a window sill like mine. Tomorrow, there will be another strange thing to look at, this is why…
I was researching the health benefits of chrysanthemum tea the other day when I came across a blog from Malaysia
http://happyhomemaker88.wordpress.com full of all sorts of interesting recipes and information. This particular cleaning enzyme had been adapted from a formula for a garbage enzyme developed by a naturopath, Dr Joeen Oon, who is concerned about the 7.3 million tonnes of waste that Malaysia generates each year. She uses the enzyme, diluted with water to do everything: cleaning toilets, bathrooms, dishes, laundry, washing fruit and vegetables, clearing drains, to mop floors, as a natural repellent and as shampoo and face cleanser!!!!! I think that deserves a few exclamation marks, don’t you?
You can use any food scraps you like but meat and other proteins will make it smell really bad during its fermenting process. In the homemaker blog she used only citrus peels. How wonderful to find another use for something the chooks won’t eat and are not great in the compost. Anything that uses lemons instantly gets my attention as I have a Meyer lemon that has obscene amounts of fruit for ten months of the year.


Here is my interpretation that combines both versions of the recipe:

Citrus Enzyme Based Multipurpose Cleaner
You will need either; a large plastic container, a screw top jar, 2 litre juice bottle or a 10 litre lidded bucket, depending on how much you want to make.
The only ingredients you need are brown sugar, kitchen scraps and water in a proportion of 1:3:10.
The amounts given below will fit into a 2 litre juice bottle.

100 g brown sugar
300g of citrus or other scraps
1 litre of water
Use a funnel to pour the sugar into the bottle.
Drop in the fruit slices
Pour in the water (tap water is okay)
Put the lid on tightly.
Mark the bottle with the date it will be ready, in 3 months time.
Give it a good shake.
For the first month you will need to open the lid as the pressure inside builds up with the fermentation process. Don’t let the bottle start to swell.
After 3 months it should be a nice brown colour, if not add an extra amount of sugar and ferment some more. It should not smell ‘rotten’ this means it needs to ferment some more.
Filter through an old cloth and bottle.

Use diluted 1 Tbsp to one litre of water. You will need to experiment to find the best dilution for your brew.
This all sounds good to me; cheap and easy to make, environmentally friendly, uses something you would otherwise throw away and has a little bit of magic too! If anyone else has done this, let me know how you got on with it.
I’ll let you know how mine goes
Nirala

Tuesday, October 13, 2009

So... I did!

Cleaning is my perfect antidote to long frustrating days wrestling with the computer. My attack on the pantry took two afternoons and a talking book and left me with two bags for the rubbish bin, the chickens with an interesting bucket of food and a box of preserves ready to donate to the local fire brigades next fund raiser.

I began with the spice rack that hangs on the back of my pantry door. I remembered a quote that I had heard: ‘Some of your spices are as old as your children…’ I tried to remember when I had last used or bought each one and ruthlessly threw out the rest, making a note on the next weeks shopping list to buy more. I then scrubbed the shelves with hot soapy water to which a little lemon scented gum essential oil had been added and replaced them all in alphabetical order. I know it sounds anal, but it makes life a lot easier when you are cooking.

Shelf by shelf, I followed a similar routine:

Clearing shelves one at a time, I checked for best by and expiry dates. My best find was brandy snap baskets purchased for Christmas 2004! I discarded any food that shows signs of insects: cobwebs, mouse poo, white dust or small holes in grains and packets. Please throw away any dried herbs that are no longer green or spices that have little aroma, they will add nothing to your cooking except the texture of sawdust!
With my squirrel mentality, each year shelves of preserves slowly take over my life and pantry. With stone fruit season hurtling towards us, it was definitely time to do some sorting. I discard any preserves that have changed colour at the top of the jar, have no label or whose contents are runny or leaking or jars where the lids are showing signs of rust. Decide how much you can logically consume and donate the rest to family, friends and charities. I don’t take a lot of notice of dates on jam and marmalade unless they look odd; the high sugar content prevents spoilage. We have happily eaten marmalade 3 or 4 years old with no ill effects. This doesn’t apply if you make preserves which are low in sugar.

In flour bins you can use a sprig of bay leaves to help repel weevils or tape to the lid of jars. If you have open packets, roll the tops down and clip with a peg or secure with a rubber band and place in a sealed box or container, labeled with its contents.
If you have ants, a 50/50 mixture of borax and icing sugar laid on a lid on their trail will kill them. I like to wipe down the shelves every now and then with a damp cloth with a few drops of eucalyptus, tea tree or lavender essential oil. Cockroaches don’t like this although you may need to place some contained baits if they become a problem. All insect and vermin problems are helped by ensuring that food is stored securely and spills are cleaned up. If they can’t find anything to eat, they won’t return.

When you reshelf, place the oldest food towards the front, so it gets used. Try eating from the pantry for a while before restocking and place new items at the back. If you put related items together in a way that makes sense to you and if you label those endless jars of jam and strange packets of flour as you buy or make them, you won’t overbuy or waste so much and everything will be easier to find.
It's back to the computer now for me, happy spring cleaning!
nirala

Monday, September 7, 2009

Miles of Food

A couple of people have asked me to explain the term “food miles’, so here goes…

Food miles are one indicator of the energy that is expended to produce our food. The first Australian food miles study, presented by Sophie Gaballa in 2005 featured 29 supermarkets items in a basket of food designed to feed two adults healthy meals for a week. 25 items were produced in Australia and transported a total of 21,000 klm by road. When the imported baked beans, sausage, tea and chocolate were added the total shot up to 70,000 klm!

Made in Australia can also be misleading – The Powerhouse Museum in Sydney show an example of chips ‘Made in Australia’…true, but also discover the inks used contain components from India, China, the US and Europe and that the aluminium from Italy, added in Melbourne, was probably smelted from Australian bauxite. This is all before it gets to the supermarket!

In the UK, lambs are raised on poorer pastures, often needing extra fodder and winter shelter. It takes less energy to raise lamb in New Zealand with its rich clover pastures and hydro power and ship it by sea, making it the better option when you weigh up all the factors.

Consider too that frozen and perishable foods need to be transported in refrigerated trucks, using still more fuel. Over packaged goods need more space in transportation. Packaging, printing and wrapping also need to be shipped from their place of manufacture to the food processor, adding to the food miles of the finished product.

We also need to consider how food is grown, what amounts of water, fertilizer and chemicals are used and what effect crops are having on the environment in terms of clearing, land degradation, salinity and the impact on wildlife and native cultures.

Sweden, Canada and the UK now have labeling that states when a product has been air freighted – informed consumers can make their own choices. What can we do? There is no need to become a food miles detective or spend hours reading (and trying to understand) labels.


Eat produce in season.
Choose products with little or no packaging.
Avoid buying processed products with multiple ingredients.
Consider eating less meat and dairy products.
Shop wisely and frugally, buy only what you need, America could feed the world with what it throws away.
Explore your local produce.
Where possible, grow your own.
Read Barbara Kingsolver’s book: “Animal, Vegetable, Miracle.”
Become a locovore (look it up!).

Don’t forget, it is okay to eat Swiss chocolate, Italian cheese and Indonesian coffee - we also need to treat ourselves occasionally whilst supporting a global economy!

Happy shopping,
Nirala

Wednesday, July 29, 2009

Brightening Wash Day Blues

I know this idea has come up before, but with so many of us consigned to a 1/4 acre or less suburban block these days, ideas for turning small spaces into productive spaces are necessary when we want to turn our hand to being a little more self-sufficient.

It is amazing what can be achieved by using wasted spaces, such as beneath the clothesline.With the growth of apartment living, and the suburban backyard shrinking, a lot of people find they no longer can use a clothesline to dry their clothes, but for those of us who still have the rotary hoist in the back, that space beneath it can be made useful.

I remember reading how in the past "ladies of the house" would grow lavender bushes next to the clothesline for draping handkerchiefs and "smalls" over to impart a lovely fragrance while they dried. Apparently it was also planted where the bed sheets could brush against the lavender while they were on the line, giving them a natural insect repellence during storage.

Mark a line about 1.5 metres out from the clothesline pole, giving you a garden diameter of 3 metres. Remember to leave an opening to walk through to get to your line! You can plant the lavender any way you like - if the soil is easy enough to dig, go straight in! If it's rocky or hard, you may want to raise a bed. Place the plants just in from your marked line. Unless your area is damp and shady, you should be able to find a lavender to suit almost any climate.

Directly around the pole, you can also add another bed about 50 centimetres out from the pole all the way around, to give a smaller bed with a diameter of 1 metre. This is a neat little bed that can be reached over easily, and it can be used to plant any number of different plants; I've seen both sweet peas and climbing beans trained up a climbing frame around the pole, with nasturtiums planted beneath. My neighbour at my old place had cherry tomatoes, but I decided to plant rosemary in mine.

I didn't think I would ever miss a clothesline! There ought to be enough distance between the two beds to walk between, and to hang long things, which will still brush against the plants in a breeze.If you're allergic to bees, it may pay you to choose plants that are not quite so attractive to them, or you could prune your lavender hedge more regularly so that it doesn't come into flower, but you can still enjoy the fragrant foliage.

There's also no reason to stick to just lavender either. Many of the scented-leaf pelargonium are suited, and they come in such scents as lemon, lime, citronella, rose, cinnamon, nutmeg, apple and violet! Curry plant is also wonderfully scented (Helichrysum italicum). If your clothesline is shaded, why not try some mint? Suitably restrained of course.

Don't feel limited to the hedging idea, either. Some of the magnificent groundcover thymes would be fabulous.Place an old table or bench near your garden "entrance" to hold a basket of laundry, and a painted terracotta pot to hold the pegs. Hanging the wash isn't anyone favourite task, but if it's got to be done - which it has :P - why not make it as pleasant as possible?

You may even want to sit a while, once the job is done :
Kerry Monteith

Thank you so much for this article Kerry and if anyone creates a garden such as this one we'd really love a photo please.

Sunday, June 28, 2009

Lion in a Teacup

Since reading Barbara Kingsolver’s book ‘Animal Vegetable, Miracle’ last year, I have become increasingly aware of the ‘food miles’ that are logged up on some of the items I regularly stock in my pantry. The book is the story of her family’s first year of committing to eating only what they can grow themselves or source locally. They allowed themselves one luxury item each, to be sourced through Fair Trade organizations. Barbara chose spices, her husband coffee. I can relate to both those choices. I hoard my Dutch cinnamon like a miser and often take its lid off so I can inhale the warm spiciness. My naturopath, a confessed coffee addict herself, advised me recently that I should give up coffee as part of a detox diet. The first few days were not pretty but I rediscovered a blend of dandelion and chicory root at the local health food store that mimicked the flavour enough for me to pretend it was the real thing. It is a good product but expensive and imported from Europe.

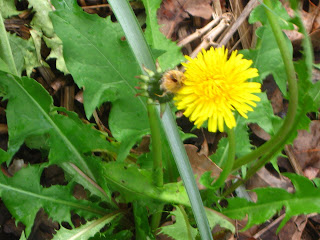
English dandelion (Taraxacum officinale) has been encouraged to grow where ever it likes in my garden as a salad green and chicken feed. It is a valuable addition to any diet, containing more nutrients than any other herb, including more Vitamin A than carrots. It is a tonic useful for the liver and gall bladder. Its sappy white juice can be used to remove warts. I had dug a large patch out to make room for more vegetable beds and was busy chucking it to the chickens when I realised it had roots on that the chickens wouldn’t eat.

Trimming and washing the roots, I chopped them into even sized slices and laid them on the racks in my electric food dryer. When dry, they went onto a baking tray which I placed in the oven of my cooling slow combustion stove as I shut it down for the night. By morning the pieces were uniformly dark brown in colour and looked like the stuff in the jar.

The taste test was next. You need to simmer the root for 5 minutes before straining. It can be used a couple of times before loosing its flavour. While similar to the commercial product, mine was a little earthier and lacked the ‘roundness’ of flavour that the chicory root provides. Mixed half/half it was good. If I can beg some chicory root, I will try that next time.


If I chose to, I could drink lemongrass or mint tea all year round as they both grow well. Instead, I chose an interesting experiment to provide one jar of produce, with very little cost to the environment or myself. I will never be able to grow coffee, tea or enough dandelion root to supply my own needs but I feel I am a little more informed about the effect of my shopping choices in terms of the environment.


For more information on eating dandelion, see Cooking with Herbs e book by Nerys Purchon.

Sunday, March 8, 2009

Spices Rare and Wonderful


Whole nutmeg
The birds discovered the peacharines the day before I was ready to pick so we stripped the tree, leaving the damaged fruit for them to finish. In a small garden it is difficult to net the trees so we are used to sharing. This crossbred tree produces huge juicy fruit that are like peaches without the fuzz but not great keepers. I knew that there would be more invisible bird holes that would turn to bruises in the next few days.

I didn’t have much time before work, so after carefully cutting around the damage and peeling a few sad peaches with the last few wrinkly plums, I put a large pot of fruit on to stew. When cool, I mix this with an equal amount of muesli and let it soak Bircher style in the fridge. With yoghurt, it is a quick and sustaining breakfast.

Some of the damaged peacharines were not quite ripe but I thought that they would pickle well in sweet and sour syrup. In typical Virgo style, my two herb and spice racks are sorted alphabetically with the overflow in a small basket in the pantry so I knew fairly quickly I had no whole star anise. It was early on a Saturday morning but we live in a trendy tourist town with a good variety of stock so I dispatched the cavalry on a mission. He returned with a very disappointing packet of broken, obviously second grade, star anise.

It got me thinking – last week we had to beg and borrow ground turmeric – there was none in the shops. We have become very blasé about using ingredients from all around the world. What would we use if they become the expensive rarities they once were? Consider that the plants that produce these may take years to reach maturity; the effort that it takes to grow, harvest and process them and the thousands of kilometers they may need to be shipped to reach us. Consider too, the exciting range of Australian spices and flavourings that there are to discover.

Cinnamon Bark

We need to show care and respect for these precious seeds, buds, nuts and leaves that give us such intense bursts of the concentrated tastes of the tropics if we choose to use them. It is best to buy smaller amounts unless you use lots. Store them in glass screw top jars away from heat and light and spices should stay viable for a year or more. Whole spices have the longest shelf life. If you can keep an electric coffee grinder exclusively to use for spices, you will be delighted by the difference. Vanilla pods seem to keep best tightly wrapped in plastic wrap and kept in the fridge. If you manage to buy a lot cheaply, make your own vanilla essence, using the method for tinctures from Nerys’ book: Healing with Herbs, the method is the same. Candle nuts, like other nuts, are best kept in the freezer until needed.


When your spices no longer have that WOW! Factor when you open the lid or grind them, its time to throw them out. Their warming properties will be useful when added in small amounts to chicken mash, especially in winter, when it is traditional to add copious amounts of pepper! Otherwise, add to the compost. Save whole spices as a filler for pot pourris – they absorb and hold essential oils wonderfully. A handful of whole spices on a fire will give up the last of their fragrance to a room. Better if you buy bulk then share with your friends, you’ll never waste any!